Saturday, November 26, 2011

Easy Peasy Banana Bread


             In the days BB (before breadmaker), I didn’t make any bread but this recipe.  It was quick, easy, required no kneading or rising, and was a great use for black bananas.  Considering I don’t eat bananas once they get a bruise or run past the slightly green/bright yellow stage, this recipe saved a lot of bananas from a garbage fate.

Ingredients:
3 – 4 ripe/black bananas
1/3 cup melted butter
1/3 – ¾ cup of sugar *
1 egg, beaten
 1 tsp vanilla
1 tsp baking soda
Pinch of salt
1 ½ cup all purpose flour

OPTIONAL: ¾ cup semi-sweet chocolate chips

* My husband and I don’t like really sweet banana bread, so I cut the sugar down to 1/3 cup.  It tastes wonderful to us.  If you like more sugar, you can go up to ¾ cup.


Mash bananas with a fork in a large bowl.
Mix melted butter into bananas.
Add sugar, egg, and vanilla.  Mix.
Sprinkle in baking soda.  Mix.
Add in flour.  Mix.
Spray a loaf pan with non-stick cooking spray or butter it.
Add in bread mixture, bake for ~ 1 hour at 350°F.

It seriously doesn’t get easier than that, right?

I gave you some pictures below of the recent loaf I made with chocolate chips.  YUM!


You'll see that I have some spiral pasta dishes next to the bread.  That casserole is awesome and I'll post about it soon!  Also - obviously my mug screams "Go Phillies!"  I should crop these pictures better....


Saturday, November 19, 2011

Homemade Soft Pretzels


                Oddly, my first bread maker post is not going to be about bread!  Instead, I’m going to tell you about these soft pretzels I made from scratch.  They were delicious.  They looked and tasted exactly as a soft pretzel should so you should definitely try them!


Recipe (from the Cuisinart Booklet)
1 cup water, room temperature
2 teaspoons salt
1 tablespoon brown sugar, firmly packed
3 ¼ cups bread flour
2 ¼ teaspoons yeast


                Okay, I dumped all that in order in my bread maker and used the Dough program.  If you don’t have a bread maker, then you can make the dough the old-fashioned way with hand kneading and rising in the oven.  It will work just as well!

                After your dough is ready, place it on a lightly floured surface.  Since I’ve never made pretzel dough before, I kneaded it slightly to get a feel for it.  

The recipe makes enough dough for 12 pretzels so it should be broken into twelve equal portions.  Take one portion and roll it on the floured surface into a long tube of dough.

                Now, the dough from my machine came out dry.  Rolling it wasn’t easy.  I’m not sure if you’ve ever watched the Auntie Anne’s workers made pretzels, but they just roll it out in a few seconds, twist it into form and move on.  This dough was not like that.  I ended up wetting my hands and the outside of the dough with water to make it easier to roll.  I had no problems with it sticking to the counter because slightly too much flour was in the dough already.  I think that if I make these again, I might reduce the flour amount or increase the water.  

                I was able to roll out each piece to 5.5 – 6 inches after about 5 – 10 minutes of work.  You will earn these pretzels.

                After each one was rolled and twisted, I placed it directly on a cookie sheet (ours are calphalon) and allowed them to rest for ~ 30 minutes.


In the mean time, prepare these things: 
Large pot of boiling water
2 cups water + 2 tablespoons dissolved baking soda
Preheat oven to 425°
Pretzel salt / kosher salt


                Place all pretzels in the boiling water and boil for three minutes.  After 90 seconds, flip each pretzel in the water.  Using tongs, remove each boiled pretzel and place it on a wire cooling rack to drain.  One at time, dip each pretzel in the dissolved baking soda mixture and place back on the cookie sheet.  Sprinkle each with the desired amount of salt.  We used kosher salt because it was easiest.  Bake at 425° for 15 – 20 minutes.

                When they are finished, place on a cooling rack (ours are stackable and I love them!).  


They will look like this!!


YUM!

Friday, November 11, 2011

My Bread Maker


  It is time to admit the deep and devoted love I have for my … breadmaker.

                Growing up, my mother hand-made cinnamon swirl raisin bread every fall.  I’m not sure how many loaves she used to make, but enough always occupied the freezer to give away as last minute gifts to teachers and friends in addition to those as planned gifts and Christmas morning breakfast.  I used to help her with the steps that my little self could do.  While I remember how to do it, I also distinctly remember how long it took.  Between kneading and rising (and kneading and rising), she was making bread long after I lost interest.

                I’m grateful that she taught me how to make bread (in addition to so many other things!) because I can fully appreciate how awesome bread makers are.  I truly think that everyone should learn to make bread from scratch (no boxed mixes!) and by hand (knead it yourself!) before ever getting one of these machines.  However, once you do, you will love it.  YOU WILL LOVE IT.

 Homemade bread used to be a holiday treat or day long project.  My husband and I now eat homemade bread every day.  I make one or two loaves a week.  I give them away as gifts.  I recently made homemade soft pretzels.  I can’t wait to make cinnamon buns.  I should buy stock in the yeast and bread flour companies. 

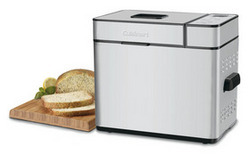
Okay, let’s start with what model I have.  My wonderful husband surprised me with the Cuisinart 2 lb Bread Maker (LINKY) for my birthday.  The KitchenKapers down the street was selling both the Cuisinart model and an Emeril Lagasse one.  The store workers both claimed that the Cuisinart one was better (for reasons that escape me now) and – bonus! – it was cheaper than Emeril one.  Sold, sir.


The machine comes with its own recipe book (LINKY) and, so far, I have not strayed too far from the book.  Sometimes I add in slightly different ingredients, but mostly I’ve followed the book.  I think I’ve now made about 30% of the recipes.

What is in the book?  My word.  The machine comes with ten different cycles: White Bread, Whole Wheat Bread, French/Italian Bread, Quick Bread, Low-Carb Bread, Gluten-Free Bread, Dough, Artisan Dough, Sweet Bread, and Jams.  Each one of those cycles has several different recipes.  My favorites so far are plain white bread (I’m so boring), Challah (so good!) and Granola Bread (yum!).  Each cycle is designed specifically as far as kneading and rising times to cook each type properly.  The shortest cycle is about 2 hours (sweet breads) and the longest is about 4 hours (whole wheat breads).

All the recipes call for bread flour, which simply has more gluten than all-purpose flour.  (There is a whole science to kneading that revolves around gluten.  Perhaps I’ll make a post about it on my easy science blog, Amedeo!)  You can use all-purpose flour, but I try to buy the right stuff.  Everything else is quite self-explanatory as far as yeast, butter, eggs, milk.  All very ordinary stuff!

Holy moley.  I just realized I can make something called “Chocolate Chip Cookie” Bread with this machine.  I’m off to try that.  Stay tuned for more!  I’m going to dedicate a whole section to my breadmaker and its goodies!

Sunday, November 6, 2011

Cross-Stitched Baby Towels


               I used to be at the age where everyone was getting married; I’m now at the age where everyone is having babies.  Not having a child myself, I find the whole diaper/nursing/bottle scene a little overwhelming.  I have no idea what a kid really needs.  Luckily, I do understand that most babies require a towel after being washed.  For this reason, I’ve mostly stuck to buying hooded towels for all my friends.

                A few years ago, Pottery Barn changed the material in their critter towels for the worse.  They used to offer a chick (pink!), a cow (blue!) or a pig (green!) in their collection.  The material was soft and absorbent.  I got rave reviews from my new-parent friends, especially if they also had a cheaper towel from Target or Babies R Us in their closets for comparison.  But when Pottery Barn introduced their new critters (frogs, elephants, bunnies, other unidentifiable creatures), the quality nose-dived.  I was actually rather upset because I loved giving the towels and the thought of finding a new go-to gift was daunting.

                I have since found that their gingham hooded towels are reasonable.  Still not the quality I come to expect from Pottery Barn, but passable.  The added bonus of these towels is that you can have the child’s name stitched on the hood.  Unfortunately, the cost Pottery Barn demands for such a service is ridiculous.  It is most certainly cheaper and easier to do it yourself!

                Here are two samples of towels I’ve given as gifts recently (NOTE: the names are not real – they are nicknames or inside jokes between me, the parents, and their friends.  Please don’t think my friends don’t know how to name their children).  Given the number of friends I have in their childbearing years, I expect my practice time to increase and my designs to become more involved.  


                What do you need to do this?

The ability to cross stitch.  If you don’t know how, don’t be too frightened to try!  It’s really quite simple.  Here’s a short tutorial (link).  I personally don’t make the elegant knots that professional cross-stitchers do .  My mom taught me how to loop the thread to start and knot it at the end in a functional, if not perfect, way.  No one sees the back – don’t get too caught up in the details.  As long as the pattern looks correct on the front, I consider it good work.  (Perhaps a tip worthy of flames from hardened crafters, but I’d hate to see someone give up because their knots aren’t perfect, you know?)

Thread.  True story – it took me three orders from JoAnn Fabrics to get the right thread for cross stitching.  My mother taught me how to cross stitch at a young age and yet, even knowing exactly what I wanted, I still couldn’t order correctly.  In my defense, though, JoAnn’s website has two insanely similar items for sale and if you don’t read carefully, you will order the wrong thing.  Twice.  

You will need FLOSS (link).  I ordered a multi-pack of colors.

Waste Canvas.  Cross-stitch is done on threaded canvas, which is fine if you want to incorporate that material into your project.  For the towels, I wanted to stitch directly on the fabric but needed a cross-stitch guide.  Waste canvas was made for this (link)!

Patterns.  A quick trip to Barnes and Noble’s magazine section lead me to several cross stitch magazines full of patterns (link, link).  They have pictures, alphabets, full projects and so much more.  All are color coded but you are free to improvise however you see fit.  Don’t see anything you like?  Design your own pattern!

Other miscellaneous items: needles, pins, graph paper, good lighting, tweezers, water

                Once you have all your materials, you need to pick a pattern.  I’ll explain the green towel since it was very straightforward.  I found an alphabet style I liked in a cross-stitch magazine.  On the graph paper, I wrote out the word “Spartacus” in the letter style by x-ing where each stitch should go.  I made sure two squares were placed in between each letter so it was spaced evenly.  I then counted how many squares I needed from start to finish, cut the waste canvas slightly larger than necessary, and pinned it to the center of the towel’s hood.  I carefully marked where the stitches would begin and where they would end with pencil.

                From here, I followed my pattern with stitches of green thread.  It is not more complicated than that!

                When you’ve finished stitching, the fun part begins!  You now have stitches holding onto the waste canvas and the towel material.  You want to remove the waste canvas and leave the stitches on the towel.

                Take the towel to the sink and wet the entire stitched area with plenty of water.  The waste canvas is quite stiff when dry but, upon wetting, will become very pliable.  

                Start with the shorter strands.  Place your tweezers at the end of one strand.  Pull straight so that one piece of waste canvas is pulled through the stitches and out.  This is just like pulling a tablecloth out from under dishes on a table.  Pull with authority but straight so you don’t disrupt your stitches.  It is easier to start with the shorter waste canvas strands and work right to left until you’ve pulled each one.  Now begin with the strands running in the perpendicular direction.

                Once they are all pulled out, you are left with your design!