Showing posts with label Baking. Show all posts

Saturday, January 28, 2012

Cake Fun


                This post isn’t meant to showcase a truly awesome cake à la Cake Boss, Ace of Cakes or Food Network Challenge.  Please, I don’t know how to build cakes!  It’s just meant to show a cute technique that I’ve used to make a fun little cake.

                I made this cake for a baby shower several years ago.  Two girls I worked with were having babies and I love them both.  I wanted to make them an awesome cake.  I went large and in charge – three layers of rich chocolate with ample buttercream frosting in between.  I frosted the entire thing with buttercream.  One girl knew she was having a boy but the other was waiting for the grand arrival so I went with green for the decorations.


-          - Light green colored frosting decorated the bottom and ridge of the cake (food colored buttercream)

-          - I added a thin sprinkling of mashed graham crackers along the edge as well

-          - Two green Winnie the Pooh pacifiers at either corner of the cake

-          - My favorite: two green sugar babyfoot prints in the center


The baby footprints: Curl your right hand into a fist.  Turn your wrist so that your thumb is on top of the fist and your pinky finger is the bottom of the fist (knuckles parallel with your arm).  Place your hand in green sugar so it sticks to your pinky finger/edge of your hand.  Gently rest your sugary fist on the buttercream to transfer the sugar.  This makes the little right foot.  Use the pad of your index finger to transfer sugar that will make the toeprints.  Use your left fist to make the left foot.

                Foggy mirrors and car windows are the best place to practice making these little footprints.  I learned to do it from friends on many bus rides home after swim practice or swim meets. 

                Enjoy!

Saturday, January 7, 2012

Rose Cupcakes


                I thought I’d continue this week with another cupcake from the What’s New, Cupcake, the sequel to Hello, Cupcake book!  I made these the weekend of my sister's wedding (they were for those of us staying at a beach house together).


                Make your favorite cupcakes.  Again, it doesn’t matter what kind, but I did specifically bake them in red cupcake liners.  It helps with the flower effect.

                To ice the cupcakes and make the flowers, you will need to gather a few things.


Ingredients
Swedish fish
Red sugar
White icing (doesn’t matter what kind)
Green tootsie roll fruit rolls
White sugar**
Rolling pin


                Start by icing the top of the cupcake with white icing.  You don’t need a tremendous amount of icing, but don’t really skimp on it either.

                Carefully roll the edge of each cupcake in the red sugar so that you have a thin sugar line just above the cupcake liner.

                Place some white sugar on the counter and put a Swedish fish in it.  Roll the fish with the rolling pin so that it flattens out, doesn’t look much like a fish anymore, and the gooey inside starts sticking to all the sugar.

** - I used both cubed white sugar and granulated white sugar for these.  In the picture above, the left hand flowers were rolled in cubed white sugar while the right hand ones were rolled in granulated sugar.  I personally think the cubed white sugar looks better.

                For each cupcake, roll out 3 - 5 fish.

                Roll one flattened fish up into a spiral and place it in the center of the iced cupcake.

                Add other flattened fish around it to create a flower.  Keep adding flattened fish around the center spiral until you feel the look is finished.

                To make the leaves, find the green tootsie roll in your fruity tootsie roll bag.  Unwrap several and microwave them for a few seconds so that they soften.  Cut each in half and roll out each half with the rolling pin.  Pick up either side of a rolled tootsie roll and pinch the ends together.  Stick inside the icing so it is held in place.


                The What’s New, Cupcake book has you also make some cupcakes in green liners.  These can be used to make stems with green jelly beans and more green tootsie roll leaves.  I didn’t have a large enough box (the book suggests placing them all in a rose box) to make the stems so I just went with all roses.

                It’s a lot of sugary stuff on one little cupcake, but they look so cute!

Tuesday, December 27, 2011

Marshmallow Flower Cupcakes


                For my 2011 finale, I wanted to show you my favorite cupcakes!


                The idea comes directly from the book “What’s New, Cupcake?” which is the sequel to “Hello, Cupcake!”  The ideas are so cute and some are easy to implement (some are actually a bit difficult, sadly).  But this one is really easy!

                Make whatever cupcakes you like.  I’m a big fan of chocolate or red velvet, myself.  Once they are cool, gather the following things:


Ingredients
Icing
Bag of mini marshmallows
Cutting board
Sharp knife
Individual bowls of colored sugar


                Frost the top of one cupcake with a minimal amount of icing.  You don’t need too much because its main purpose is to hold the marshmallows on.  Because the marshmallows are white, I usually use a white frosting, but there’s no rule that says you have to!

                Now, take one mini marshmallow and cut it in half along the diagonal (as shown in the diagram below).  


                Drop both halves in the colored sugar.  Be sure that the sticky inside of the marshmallow has a lot of sugar stuck to it.  Place the marshmallow half on the outer edge of the cupcake.  Continue to add marshmallow halves dipped in sugar all around the edge.  Once the edge is complete, start a new circle of marshmallow halves just inside the first circle.  Make as many circles as you can.

                For the center of the flower, I cut a marshmallow in half directly across the middle (as shown in the diagram below), dip it in sugar, and stick it on.


                The cupcakes come out gorgeous!  So gorgeous, in fact, that if you enter them in a baking contest, people will be too scared to eat one (true story).  I’ve made many versions of these – all the pictures are below.  Enjoy!!


Saturday, December 17, 2011

Pink Champagne Cupcakes


                These are fabulous and easy to make.  Also?  No need for them to be pink – you can make them any color!

                The recipe can also be found on Betty Crocker’s website (linky).

Cupcakes
1 box Betty Crocker white cake mix
1 ¼ cup champagne
1/3 cup vegetable oil
3 egg whites
4 – 5 drops red food coloring

Pre-heat oven to 350°F.

Line baking pan with paper baking cups. (I bought some fun ones from KitchenKapers.)

In a large bowl, mix dry cake mix and champagne.  Add oil, egg whites and food coloring.  You are really free to make the cupcakes whatever color you want – the batter is white and a blank slate!

Fill each cupcake liner ~ 2/3 full.

Bake 17 – 22 minutes until toothpick comes out clean.  Place on baking rack to cool.


Icing

Betty Crocker offers a champagne frosting based on butter, powdered sugar and champagne.  I’m super duper picky about icing and really think that only cream cheese frosting should exist.  I purchased some cream cheese frosting because I was in a rush, but several recipes are out there to make your own! 

I added a few drops of red food coloring to the frosting and mixed until it was nearly the same color as the cupcakes.

Then, I used a pastry bag with a star tip: 


I have a mechanical pastry bag (like this) from Target, but it’s more trouble than it’s worth.  I only break it out for certain things and would much prefer a real pastry bag.  You can even make your own star tip by cutting the tip of a Ziploc bag.  

Anyway, I started from the outside of the cupcake and moved in a spiral inward.  To give it a nice tip at the end, I held the bag upright in the center, pushed a bit more icing out, stopped and pulled directly upward.

I then sprinkled clear sugar on the pink icing as a finishing touch!


Eat me.


Saturday, November 26, 2011

Easy Peasy Banana Bread


             In the days BB (before breadmaker), I didn’t make any bread but this recipe.  It was quick, easy, required no kneading or rising, and was a great use for black bananas.  Considering I don’t eat bananas once they get a bruise or run past the slightly green/bright yellow stage, this recipe saved a lot of bananas from a garbage fate.

Ingredients:
3 – 4 ripe/black bananas
1/3 cup melted butter
1/3 – ¾ cup of sugar *
1 egg, beaten
 1 tsp vanilla
1 tsp baking soda
Pinch of salt
1 ½ cup all purpose flour

OPTIONAL: ¾ cup semi-sweet chocolate chips

* My husband and I don’t like really sweet banana bread, so I cut the sugar down to 1/3 cup.  It tastes wonderful to us.  If you like more sugar, you can go up to ¾ cup.


Mash bananas with a fork in a large bowl.
Mix melted butter into bananas.
Add sugar, egg, and vanilla.  Mix.
Sprinkle in baking soda.  Mix.
Add in flour.  Mix.
Spray a loaf pan with non-stick cooking spray or butter it.
Add in bread mixture, bake for ~ 1 hour at 350°F.

It seriously doesn’t get easier than that, right?

I gave you some pictures below of the recent loaf I made with chocolate chips.  YUM!


You'll see that I have some spiral pasta dishes next to the bread.  That casserole is awesome and I'll post about it soon!  Also - obviously my mug screams "Go Phillies!"  I should crop these pictures better....


Saturday, November 19, 2011

Homemade Soft Pretzels


                Oddly, my first bread maker post is not going to be about bread!  Instead, I’m going to tell you about these soft pretzels I made from scratch.  They were delicious.  They looked and tasted exactly as a soft pretzel should so you should definitely try them!


Recipe (from the Cuisinart Booklet)
1 cup water, room temperature
2 teaspoons salt
1 tablespoon brown sugar, firmly packed
3 ¼ cups bread flour
2 ¼ teaspoons yeast


                Okay, I dumped all that in order in my bread maker and used the Dough program.  If you don’t have a bread maker, then you can make the dough the old-fashioned way with hand kneading and rising in the oven.  It will work just as well!

                After your dough is ready, place it on a lightly floured surface.  Since I’ve never made pretzel dough before, I kneaded it slightly to get a feel for it.  

The recipe makes enough dough for 12 pretzels so it should be broken into twelve equal portions.  Take one portion and roll it on the floured surface into a long tube of dough.

                Now, the dough from my machine came out dry.  Rolling it wasn’t easy.  I’m not sure if you’ve ever watched the Auntie Anne’s workers made pretzels, but they just roll it out in a few seconds, twist it into form and move on.  This dough was not like that.  I ended up wetting my hands and the outside of the dough with water to make it easier to roll.  I had no problems with it sticking to the counter because slightly too much flour was in the dough already.  I think that if I make these again, I might reduce the flour amount or increase the water.  

                I was able to roll out each piece to 5.5 – 6 inches after about 5 – 10 minutes of work.  You will earn these pretzels.

                After each one was rolled and twisted, I placed it directly on a cookie sheet (ours are calphalon) and allowed them to rest for ~ 30 minutes.


In the mean time, prepare these things: 
Large pot of boiling water
2 cups water + 2 tablespoons dissolved baking soda
Preheat oven to 425°
Pretzel salt / kosher salt


                Place all pretzels in the boiling water and boil for three minutes.  After 90 seconds, flip each pretzel in the water.  Using tongs, remove each boiled pretzel and place it on a wire cooling rack to drain.  One at time, dip each pretzel in the dissolved baking soda mixture and place back on the cookie sheet.  Sprinkle each with the desired amount of salt.  We used kosher salt because it was easiest.  Bake at 425° for 15 – 20 minutes.

                When they are finished, place on a cooling rack (ours are stackable and I love them!).  


They will look like this!!


YUM!

Friday, November 11, 2011

My Bread Maker


  It is time to admit the deep and devoted love I have for my … breadmaker.

                Growing up, my mother hand-made cinnamon swirl raisin bread every fall.  I’m not sure how many loaves she used to make, but enough always occupied the freezer to give away as last minute gifts to teachers and friends in addition to those as planned gifts and Christmas morning breakfast.  I used to help her with the steps that my little self could do.  While I remember how to do it, I also distinctly remember how long it took.  Between kneading and rising (and kneading and rising), she was making bread long after I lost interest.

                I’m grateful that she taught me how to make bread (in addition to so many other things!) because I can fully appreciate how awesome bread makers are.  I truly think that everyone should learn to make bread from scratch (no boxed mixes!) and by hand (knead it yourself!) before ever getting one of these machines.  However, once you do, you will love it.  YOU WILL LOVE IT.

 Homemade bread used to be a holiday treat or day long project.  My husband and I now eat homemade bread every day.  I make one or two loaves a week.  I give them away as gifts.  I recently made homemade soft pretzels.  I can’t wait to make cinnamon buns.  I should buy stock in the yeast and bread flour companies. 

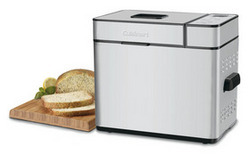
Okay, let’s start with what model I have.  My wonderful husband surprised me with the Cuisinart 2 lb Bread Maker (LINKY) for my birthday.  The KitchenKapers down the street was selling both the Cuisinart model and an Emeril Lagasse one.  The store workers both claimed that the Cuisinart one was better (for reasons that escape me now) and – bonus! – it was cheaper than Emeril one.  Sold, sir.


The machine comes with its own recipe book (LINKY) and, so far, I have not strayed too far from the book.  Sometimes I add in slightly different ingredients, but mostly I’ve followed the book.  I think I’ve now made about 30% of the recipes.

What is in the book?  My word.  The machine comes with ten different cycles: White Bread, Whole Wheat Bread, French/Italian Bread, Quick Bread, Low-Carb Bread, Gluten-Free Bread, Dough, Artisan Dough, Sweet Bread, and Jams.  Each one of those cycles has several different recipes.  My favorites so far are plain white bread (I’m so boring), Challah (so good!) and Granola Bread (yum!).  Each cycle is designed specifically as far as kneading and rising times to cook each type properly.  The shortest cycle is about 2 hours (sweet breads) and the longest is about 4 hours (whole wheat breads).

All the recipes call for bread flour, which simply has more gluten than all-purpose flour.  (There is a whole science to kneading that revolves around gluten.  Perhaps I’ll make a post about it on my easy science blog, Amedeo!)  You can use all-purpose flour, but I try to buy the right stuff.  Everything else is quite self-explanatory as far as yeast, butter, eggs, milk.  All very ordinary stuff!

Holy moley.  I just realized I can make something called “Chocolate Chip Cookie” Bread with this machine.  I’m off to try that.  Stay tuned for more!  I’m going to dedicate a whole section to my breadmaker and its goodies!

Monday, October 17, 2011

Sugar Cookies & Chocolate Sugar Cookies


         I was inspired this weekend to make sugar cookies in the shapes of test tubes and flasks.  Sadly, Center City Philadelphia wasn’t interested in selling cookie cutters in those shapes so I’ll make them another day.  Instead, I made Jack O’Lanterns.


Yummy Sugar Cookie Recipe (from Williams-Sonoma)
Ingredients:
2 ½ cups of flour*
½ tsp salt
12 tbsps unsalted butter
1 cup sugar
1 egg
1 ½ tsp vanilla
Two sheets of plastic wrap

*For chocolate sugar cookies, replace ½ cup of flour with ½ cup of unsweetened cocoa powder

Preparation Directions
Place flour, salt and – if necessary – cocoa powder in a bowl.  Set aside.
Beat butter on high until creamy (~ 2 minutes).
Reduce speed to medium and add sugar slowly.  Stop occasionally to scrape down the bowl and clean up the beater so the sugar will be incorporated.
Beat butter + sugar mixture until light and fluffy.
Add egg and vanilla, beat for one minute.  Be sure to scrape down the sides of bowl for full incorporation.
Add half the flour mixture and beat until the most of the flour has been absorbed.  Scrape down the sides of the bowl.
Add the other half and again mix until fully absorbed.
Remove the dough from the bowl and knead together. 
Split into two halves, knead into a ball, wrap in plastic wrap and place in the fridge for 2 hours – 2 days.

Cookie Cutting
Tools
Rolling pin
All purpose flour
Cookie cutters
Cookie sheets
Spray oil/grease the pan

Cookie preparation
Preheat oven to 350°.
Flour your counter.  The recipe says lightly flour – I’m telling you to flour it.  Otherwise, your cookie dough will stick to the rolling pin and/or the counter.
Remove a ball of dough from the fridge and let warm to room temperature (~ 5 minutes).
Roll out carefully to a sheet ~ 3 mm thick.  

Tips:
Thicker is better than thinner… 
The best technique for rolling, especially with the chocolate sugar cookie dough, is to place the pin in the middle and roll towards one edge.  Then place back in the middle and roll to another edge.  This minimizes cracking and sticking. 
Also, I recommend flattening the dough as much as possible with your hands before starting with the rolling pin.

Flour the edges of your cookie cutters and cut out your shapes.
Place cut cookies on a pre-greased cookie sheet.
Knead the scraps back together into a cohesive ball of dough to roll it out again.  Directions say to only re-roll dough twice.  I re-rolled upwards of 4 times and it was fine.  Keep going until you run out of dough or patience!


Cookie Decorating
Ingredients
Colored sugar (see end)
Powdered sugar

Decorating Tips

I used my fingers to place colored sugar on the cookies before baking.  To keep it sticking to the cookie, I ran my fingers over the sugar and slightly rubbed it into the top of the cookie.  

If you’d like to use powdered sugar, bake the cookie first then sift powdered sugar onto cookie upon removing it from the oven.

Baking Directions

Bake for 8 minutes.  The bottoms should be golden brown.

Tips:
            Rolling the cookie too thin will lower cooking time so keep an eye on them!
The recipe recommends 12 – 14 minutes for bake time, but that was much too long on my oven.  I burned my first batch.  Luckily, I found my burnt sugar cookies to taste just as good as the non-burnt ones!


Colored Sugar!

                I had no idea that I could color my own sugar.  I looked all over for orange colored granulated sugar before making these cookies but to no avail.  A quick Google search assured me that I could color my own sugar with food coloring.  Good to know!

Ingredients
1/3 cup of white, granulated sugar
Food coloring
Ziploc bag

Directions
Add sugar to Ziploc bag.
Add the minimum amount of food coloring drops needed to create the desired color.
Seal bag and work the sugar into the dye with your fingers.  Keep going, shaking, moving the sugar around, etc until all the sugar has changed color.
Adjust color with more food coloring, if necessary.  Try to keep coloring to a minimum, however.


My cookie cutters came from Williams Sonoma.  It was a Jack O’Lantern pack – LINKY.
However, I nearly bought these from Willians Sonoma instead and planned to frost my sugar cookies.  Another time!  LINKY.